
How to add and manage contacts in Brixit CRM
Use Sales → Contacts for the people your team works with, including new leads, buyers, tenants and property owners. Keep the person’s details here and their property requirements in a linked inquiry.
Before you start: you need access to Contacts and permission to add a contact. Have the person’s name, email and primary phone number ready.
1. Open the contact form
- Open Sales → Contacts.
- Check whether the person already exists, using Filters to narrow the list. Open an existing contact when it is the same person.
- Select Add. The Add Lead Contact form opens on the right.
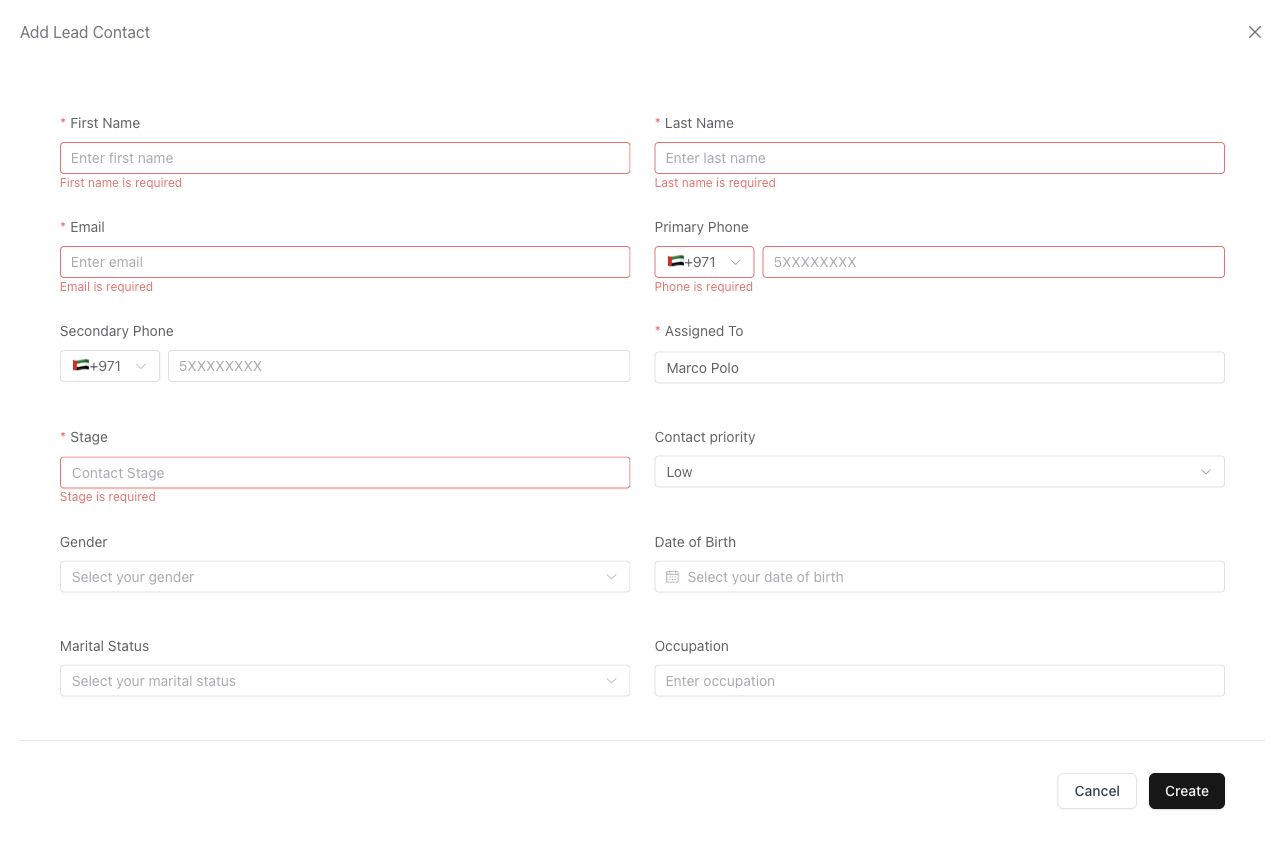
The upper part of the contact form. Required-field messages identify information to complete.
2. Enter the person’s details
- Enter First Name, Last Name and a valid Email.
- Select the country code and enter the Primary Phone. Add a secondary number if needed.
- Check Assigned To. This is the colleague responsible for the contact; your role may limit which colleagues you can select.
- Choose a Stage from your company’s contact stages and set Contact priority.
- Scroll down to add Source, languages, communication preferences and useful Notes. Complete any required custom fields your company has added.
The current form requires first name, last name, email, primary phone, assignee and stage. Do not use invented contact details to get past a required field; ask your administrator how your team handles incomplete leads.
3. Add an inquiry when you know their requirements
Near the bottom, turn on Add inquiry (optional) if you also want to record a property requirement. Complete the inquiry fields that appear, including its intent, assignee and pipeline. This creates the inquiry linked to the contact when you save.
Leave the option off when you only need the contact record. You can add an inquiry later from Sales → Inquiries and select this person as Lead Contact.
4. Save and check the record
- Select Create.
- If the form remains open, resolve the field messages and try again.
- After the save succeeds, find the person in Contacts and select their name.
- Check their details, assigned colleague and stage. If you added an inquiry, check that it is linked to the correct contact.
Keep the contact up to date
Use the row’s action menu to edit the record. Choose List View for a table or Kanban View to review contacts by stage. The Interactions column helps you see recent activity and the next task. Keep follow-up information on the record so the next colleague can understand what happened.
Upload is available for importing contacts from a file. Review the import screen’s format and mapping requirements before submitting a file; the manual form above is for adding one person at a time.
Work from the contact profile
Use Overview for the activity composer: create a note or follow-up, or send email/WhatsApp when the connected tools and your permissions allow it. Use Documents for supporting files, Inquiries for requirements, and the available Properties, Transactions and History tabs for related records and changes.
Use Send to Pool when releasing the contact for another agent; follow the Contact Pool guide because the related inquiries move with it.
If something does not work
| What you see | What to check |
|---|---|
| Missing stage, source or assignee | Ask an administrator to check the company’s configured options and your access. |
| Email or phone validation | Check the email format, selected country code and phone number. |
| A duplicate warning | Review the existing person before creating another record. |
| Contact missing after saving | Clear filters, return to the All view and check who the contact is assigned to. |
| Hidden email or phone in the table | Contact details may be masked. Use the available reveal control only when your role allows it. |
Next: record the person’s requirements as an inquiry, or return to all CRM guides.